Thursday, December 19, 2013

NetOffice an MsWord class Wrapper


In order to produce a Word document without MsOffice installed, I recommend to use this suite of libraries, that are Open Source (http://netoffice.codeplex.com/). There are plenty of reasons that convincing me that this is a good  way to interact with MsOffice, I let you to check if these are good enough also for you. By the way I had prepared a C# Class with an example to try. This class wraps very typical functionalities in document generation.

These functions are simple and intuitive:

  • Open and Create a Document.
  • Writing
  • Attach a Picture
  • Generating a Table
  • Text Formatting  
Many other can be added and you can improve this class very easy as you prefer.
First of all you have to download the package on your pc (http://netoffice.codeplex.com/releases/view/70943) and install it, then it is enough to find the dlls mentioned below, and attach that to the project.


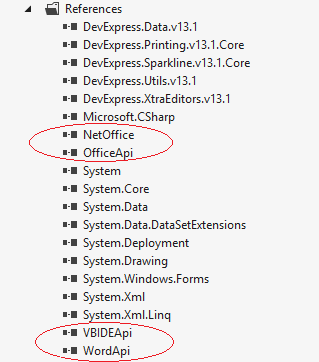
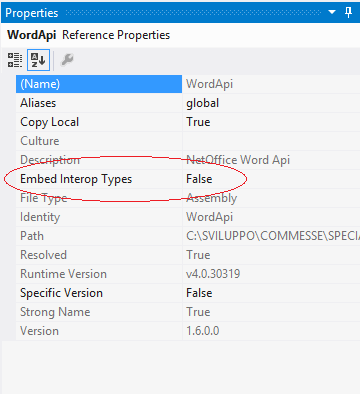
Please set the “Embed Interop Types” property to False.


In the example I have prepared, it is possible to find every specific functionalities I wrote before. So with very few code here the demonstration:
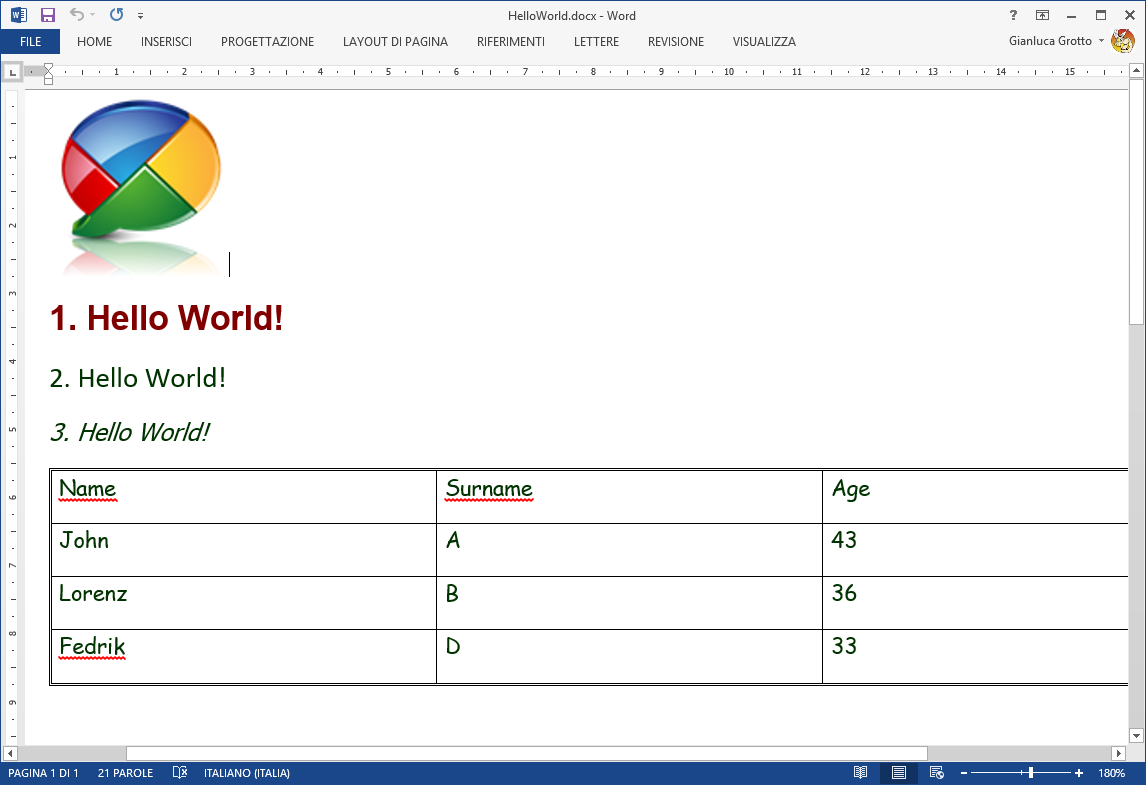

List lPersons = new List();
lPersons.Add(new Person("John","Anderson", 43));
lPersons.Add(new Person("Lorenz", "Bullock", 36));
lPersons.Add(new Person("Frank", "Carlson", 28));
lPersons.Add(new Person("Frederick", "Doson", 33));

WordWrapper oWord = new WordWrapper();

if (File.Exists(sFile))
  oWord.OpenDocument(sFile);
else
  oWord.CreateDocument(sFile, false);

oWord.AddPicture(sDir + "image.png", true);

oWord.SetFont("Arial", WdColor.wdColorDarkRed, 14, true);
oWord.WriteText("1. Hello World!");

oWord.PrintTable(lPersons);
            
oWord.Save();
oWord.CloseAndDispose();
oWord.ShowDocument(sFile);

One thing I appreciate more is that the API is Syntactically and semantically identical to the Microsoft Interop Assemblies so if you before had used Microsoft API this is “easy peasy lemon squeezy”! The first thing to do is to create an Application object and disable all messages:

public WordWrapper()
{
  moApp = new Word.Application();
  moApp.DisplayAlerts = WdAlertLevel.wdAlertsNone;
}

Once you have the Application Member moApp you can manipulate the Word Documents:

public void OpenDocument(string sFileName)
{
  if (moApp == null) return;
  msFileName = sFileName;
  moDoc = moApp.Documents.Open(sFileName);
}

Your Document is now open and can be used to interact.

public void AddPicture(
string sFileName, 
bool bNewParagraph = true, 
int iWidth = 0, 
int iHeight = 0)
{
  if (!File.Exists(sFileName)) return;
  if (moApp == null) return;
  if (moDoc == null) return;

  var shape = moApp.Selection.InlineShapes.AddPicture(sFileName, true, true);

  if (iWidth > 0)
    shape.Width = iWidth;
  if (iHeight > 0)
    shape.Height = iHeight;

  if (bNewParagraph)
    moApp.Selection.TypeParagraph();
}

download here!

Sunday, November 17, 2013

What about a Dynamic Flow Chart Control? (Part2)


Every Entity will have potentially 8 vertex each one could have also more than one connection.

public enum VertexPosition { None, TopLeft, TopRight, TopMiddle, BottomLeft, BottomMiddle, BottomRight, MiddleLeft, MiddleRight }

So I imagined a class called FCBaseControl where to put a List of Connections and a Text property. Simple but efficient.

Connections get or set Connection items to define relations both graphics and logics.
Caption get or set a Text description that appear into the Entity area.

The FCBaseControl expose also two Method:

public Point GetVertex(VertexPosition ePosition, int iDistance = 5)
public void GetAutomaticPositions(FCControlBase c1, FCControlBase c2, out VertexPosition or, out VertexPosition dest)

GetVertex() return the coordinates (Point) of a given Vertex, while GetAutomaticPositions() get the best Vertex to connect c1 to c2 without overlapping. Connection object represent a logical relation and an hypothetic graphical connection, because the graphical connection can be changed run-time as I will show you in this article.

One event it is also published, this is for redrawing run-time the Entity object.

public event LocationDraggedEvent LocationDragged;
The next step will be build a control that will provide all redrawing activities without any operator iterations. A canvas where to paint our “pictures”. This object is called FCCanvasPanel and it is a simple UserControl derived class.

[Designer("System.Windows.Forms.Design.ParentControlDesigner, System.Design", typeof(IDesigner))]
    public partial class FCCanvasPanel : UserControl

The ParentControlDesigner reference extends the design mode behavior of a Control that supports nested controls, otherwise it should be impossible to manage other controls inside it. As I mentioned before this control should be able to redraw the connections with also the ability of a clever redrawing. Property AutoConnect enable the clever redrawing.


This very simple object will do the dirty job on the backstage.
This is the private Method that do the job:

private void DrawConnections()
{
            
    PaintElement draw = new PaintElement(this.CreateGraphics());

    draw.Color = Color.Black;

    foreach (var item in this.Controls)
    {
        if (item is FCControlBase)
        {
            FCControlBase c1 = (FCControlBase)item;

            foreach (Connection con in c1.Connections)
            {
                Point p1 = new Point();
                Point p2 = new Point();
                if (con.Child != null)
                {
                    if (AutoConnect)
                    {
                        FCControlBase c2 = (FCControlBase)con.Child;

                        VertexPosition or, dest;
                        FCControlBase.GetAutomaticPositions(c1, c2, out or, out dest);

                        if (or == VertexPosition.None || dest == VertexPosition.None)
                            continue;

                        p1 = c1.GetVertex(or, 10);//c1.GetVertex(con.Origin, 10);
                        p2 = c2.GetVertex(dest, 5); //c2.GetVertex(con.Destination, 5);
                    }
                    else
                    {
                        p1 = c1.GetVertex(con.Origin, 10);
                        FCControlBase c2 = (FCControlBase)con.Child;
                        p2 = c2.GetVertex(con.Destination, 5);
                    }

                    draw.Color = con.Color;
                    if (con.Type == ConjunctionType.Arrow)
                        draw.Arrow(p1, p2);
                    else if (con.Type == ConjunctionType.Line)
                        draw.Line(p1, p2);

                    if (con.Text != "")
                    {
                        Point pMid = draw.GetMiddle(p1, p2);
                        double dAngle = draw.GetAngle(p1, p2);
                        RecalcTextPointByAngle(dAngle, ref pMid);
                        draw.Text(pMid, con.Text, new Font("Arial", 8), Color.Black);
                    }
                }
            }

        }
    }
}


NOTE: I add this note in order to say sorry to the readers, because for commercial reason I cannot divulge more informations. I hope these two post can inspire you to develop a more complex library.


Part 1

Sunday, November 3, 2013

What about a Dynamic Flow Chart Control? (Part1)

This is the idea: I would like to build a “FlowChart” control where the “Entities” are the classical controls, like buttons, panels, label, picture etc, and the graphical relations are maintained also if the position between elements is changed, or if new elements are added.

In figure Number 1 there is the initial structure, the colored rectangles are my “special objects” FCControlBase.

Each one are connected, at least, with another one. Pressing Draw the relations are showed (figure 2).

Figure1: Initial Structure

Figure2: Relations between Entities

Now image to change the structure, all relations are maintained and redraw correctly by the control like in figure 3.
Figure3: New Structure with the relations

This is only a starting point to use to improve your projects. The base classes are Open Source, so you could enjoy developing it more. But now let’s see the basic ideas.

In figure 4 I have used the control to illustrate the custom library and the main properties.

Figure 4: Classes Architecture

The base class FCControlBase has two properties Connections and Caption. The first one maintains the relations between the Entities, and obviously “Caption” is the text displayed into the block.

Connection

This class is the core, it exposes the linked Childs to the current Entity, here the Properties:       
  • Child     get or set the FCControlBase connected.
  • Type     get or set the ConjunctionType (Line, or ArrowLine …)
  • Origin   get or set the VertexPosition. Each Entity can be connected graphically to one of eight vertex.
  • Destination        get or set VertexPosition.
  • Color     get or set a Line Color.
  • Text      get or set a description.

Figure 5: Property Connections Editor


public class Connection
    {
        public event PropertyChangedEventHandler PropertyChanged;

        private void OnPropertyChanged(string propertyName)
        {
            if (PropertyChanged != null)
                PropertyChanged(this, new PropertyChangedEventArgs(propertyName));
        }

        VertexPosition mOrigin { get; set; }
        VertexPosition mDestination { get; set; }
        UserControl mChild { get; set; }
        ConjunctionType mType { get; set; }
        Color mColor { get; set; }
        string mText { get; set; }

        public VertexPosition Origin { get { return mOrigin; } set { mOrigin = value; OnPropertyChanged("Origin"); } }
        public VertexPosition Destination { get { return mDestination; } set { mDestination = value; OnPropertyChanged("Destination"); } }
        public UserControl Child { get { return mChild; } set { mChild = value; OnPropertyChanged("Child"); } }
        public ConjunctionType Type { get { return mType; } set { mType = value; OnPropertyChanged("Type"); } }
        public Color Color { get { return mColor; } set { mColor = value; OnPropertyChanged("Color"); } }
        public string Text { get { return mText; } set { mText = value; OnPropertyChanged("Text"); } }

        public Connection()
        {
            Origin = VertexPosition.BottomMiddle;
            Destination = VertexPosition.TopMiddle;
            Child = null;
            Type = ConjunctionType.Arrow;
            Color = Color.Black;
            Text = "";
        }
    }


Part 2

Thursday, September 12, 2013

Cripto Class


Some years ago after reading the Simon Singh book's "The Secret History of Codes and Code-breaking" I created my first Cripto class. The main idea was a kind of Enigma code, with simple tricks to improve it. In the time this class was used always more. In this article I present the class and the contained ideas.

public class Cripto
    {
        const int SIZE_ALPHABET = 256;
        const int LOWER_BOUND = 32;

        byte[] msKeyWord = new byte[] {0x49, 0x76, 0x60, 0x6e, 0x31, 0x4d, 
            0x3f, 0x60, 0x78, 0x43, 0x64, 0x65, 0x74, 0x5b, 0x6e, 0x7f};
        string msLastCriptedStr = "";

This class uses a key phrase (KP) that can have lenght as you want, in the example is 13 chars as default.
For security reason this key phrase is expressed in Hexadecimal and stored on an array. The german army had a book with these key phrases, every day had a different phrase. There is a nice movie directed by Michael Apted from a screenplay by Tom Stoppard about "Enigma" that  I suggest to watch. Alan Touring was also involved in decoding it and many spy stories talk about that tricky code.

It is possible to change this KP when the object is created.

public Cripto(string aKeyWord)
        {
            if (aKeyWord != "")
                msKeyWord = System.Text.Encoding.Unicode.GetBytes(aKeyWord);
        }

The main methods are simply two: Encrypt() and Decrypt() they returns as result a string.


public string Encrypt(string aText)
        {
            int apos; //alphabet pos
            int npos; //new coded pos
            int kwi = 0; //KeyWord Index
            int kwa; //KeyWord alphabet
            string s = ""; //coded string

            int l = aText.Length; //string length
            for (int i = 0; i < l; i++)
            {
                kwa = (int)msKeyWord[kwi]; //choose cripto alphabet
                kwi = kwi + 1; //set keyword index
                //if last key character restart from first position
                if (kwi == msKeyWord.Length) kwi = 0;

                apos = (int)aText[i];
                npos = (kwa + apos) % SIZE_ALPHABET;
                s = s + (char)npos; //multi alphabet traslation                
            }

            msLastCriptedStr = s;
            return s;
        }

public string Decrypt(string aText)
        {

            int l; //i=string pos;
            int apos; //alphabet pos
            int npos; //new coded pos
            int kwi = 0; //KeyWord Index
            int kwa; //KeyWord alphabet
            string s = ""; //coded string

            l = aText.Length; //string length
            for (int i = 0; i < l; i++)
            {
                kwa = (int)(msKeyWord[kwi]); //chose decripto alphabet
                kwi = kwi + 1; //set keyword index
                //if last key character restart from first position
                if (kwi == msKeyWord.Length) kwi = 0;

                apos = (int)(aText[i]);
                npos = (SIZE_ALPHABET + apos - kwa) % SIZE_ALPHABET;
                s = s + (char)(npos); //multi alphabet traslation                
            }

            return s;
        }

How the algorithm works: Every chars of your string is replaced with one new letter. This letter is taken each time from different alphabet (it depend on KP). The char position is the same of the examined input string character. The KP provides a sequence of index that are the characters position of the first alphabet.


Friday, September 6, 2013

Message Grid Component


Another component that cannot miss on your toolbox is a Form where to append all messages.
When I talk about messages, I mean debug messages, user messages, error messages. This form is used, typically, on automation program or calculation and analysis application but also in many other contexts.
By the way, it is really a useful component. What it makes, it is simply said: first of all defines some methods to append a message on a list and visualize it, then allows to save all rows on a text file, a log file.


Message Class

A Message class has four main properties:
• The Type that can be an enumerative value Error, Warning or Infos
• A Code. Often is useful assign a code to each message.
• A Text: the description.
• A Count: For example if an error appears systematically, it can be useful update a counter and a date, insted to append it again. While on file the message is always saved.

MessagesCollection Class

The MessagesCollection class, manage a list of Message objects with the possibility to limit a number of these. It save every new message on a log text file.
This is a constructor declaration:

public MessagesCollection(string asFileName, int aiMaxElements)


It defines a simple method to add a message:
public void Add(EnumMessageType aoType, string asCode, string asMessage, bool abAddOnlyIfNew = true)

or to clear a list of these:
public void Clear()

public void Clear(string asCode)


MessagesGrid Control

At the end, we have a grid for a front end visualization. For the developer it is possible to access the MessagesCollection object by the property Messages, it can use the Add method as well. All other user activity can be done from the Form.


download sample

Sunday, June 16, 2013

How to Prepare a Demo Database


How many times you have the necessity of making a demo. Often this means you need to update database values.

You have to show real data, but at same time protect sensible customer information. For these reason I have thought a simple application that populate your database tables with “random” data or simply update or overwrite the existing values.

This Example operates with a demo database downloadable from this link. The database is SQLServer but you can easily move the example with other different databases.

For this application I connect both SQLServer and MySQL, using IDbConnection interface. You can download MySQL Connector from this web page (http://dev.mysql.com/doc/index-connectors.html).

The source code has many usefull class, like a RandomClass, but you can find of your interest the possibility to choose the values from different sources like file of names, surnames, companies etc.
I have made a method to move all date forward in order to have the last date in the table equal to the current date. If you have an historical database with old dates, you can arrange these in order to update dates toward today.

Of course you can have fun creating n variants from this example to your needs.


public class RandomClass
{
    Random random = new Random();

    // Generate a random integer between to values
    public int RandomInteger(int min, int max)
    {
        //Random random = new Random();
        return random.Next(min, max);
    }

    // Generate a random double number
    public double RandomFloat()
    {
        double mantissa = (random.NextDouble() * 2.0) - 1.0;
        double exponent = Math.Pow(2.0, random.Next(-126, 128));
        return (float)(mantissa * exponent);
    }

    // Generate a random double number
    public double RandomFloat(double min, double max)
    {
        return min + random.NextDouble() * (max - min);
    }

    // Generates a random string with the given length
    public string RandomString(int size, bool lowerCase)
    {
        StringBuilder builder = new StringBuilder();
        char ch;
        for (int i = 0; i < size; i++)
        {
            ch = Convert.ToChar(Convert.ToInt32(Math.Floor(26 * random.NextDouble() + 65)));
            builder.Append(ch);
        }
        if (lowerCase)
            return builder.ToString().ToLower();
        return builder.ToString();
    }

    // Generate a Random dateTime between Periods
    public DateTime RandomDateTime(DateTime from, DateTime to)
    {
        var range = to - from;
        var randTimeSpan = new TimeSpan((long)(random.NextDouble() * range.Ticks));
        return from + randTimeSpan;
    }

    // Generate a Random dateTime
    public DateTime RandomDateTime()
    {
        string dateString = "01/01/2000 08:30:00";
        DateTime from = DateTime.Parse(dateString);
        DateTime to = DateTime.Now;
        var range = to - from;
        var randTimeSpan = new TimeSpan((long)(random.NextDouble() * range.Ticks));
        return from + randTimeSpan;
    }
}

Tuesday, May 7, 2013

Working Progress Form


On this post I documented how to realize a working progress Window, with two progress bars. One bar for a potential main loop and another one for a secondary loop. For example, this could be useful if you need to import many file with many records, in this case the main bar represent the file and the second bar a current record. Another typical situation is when you have to compute an algorithm that require two nested loops etc..
This Window must be independent in order to show a progression but also to control the process, allowing to Cancel the current computation.
Above How I designed a Window.

In this example, I have omitted the control part, like Cancel or Stop management.
To be independent the Window must be a Thread that live a part, so define a Thread object inside the class.

public partial class WorkInProgress : Form
{
   public static Thread moThread = null;
   public static Form moOwner = null;
   public static WorkInProgress moForm = null;

The idea is to have a unique static Class so it should be easy to use it with proper static methods like:

static public void StartFormAsThread(Form oOwner)
{
    moOwner = oOwner;
    moThread = new Thread(new ThreadStart(ShowForm));
    moThread.Start();
}
static public void StopFormAsThread()
{
    if (moForm == null) return;
    moThread.Abort();
    moThread = null;
    moOwner.Invoke((MethodInvoker)delegate
    {
        moForm.Close();
        moForm = null;
        moOwner = null;
    });
}

You can see that no Form is initialized or showed directly with this method, this is because there is another method that is involved in this, see ShowForm(). When thread starts a ShowForm() is called.
The purpose of UpdateProgress() is to show a Window, and refresh the bar progression:

public static void UpdateProgress(ProgressArgs arg)
{
    if (moForm == null) return;
    try
    {
        moForm.pbFiles.Minimum = arg.FileMin;
        moForm.pbFiles.Maximum = arg.FileMax;
        moForm.pbFiles.Value = arg.FilePos;
        moForm.pbFiles.Refresh();

        moForm.pbRows.Minimum = arg.Min;
        moForm.pbRows.Maximum = arg.Max;
        moForm.pbRows.Value = arg.Pos;
        moForm.pbRows.Refresh();

        moForm.labInfos.Text = arg.FileName;
        moForm.labInfos.Refresh();
        moForm.BringToFront();
    }
    catch (Exception ex)
    {
        MessageBox.Show(arg.FilePos.ToString() + ", " + arg.Pos.ToString());
        // throw;
    }
}

static public void ShowForm()
{
    moForm = new WorkInProgress();
    //moForm.TopMost = true;
    moForm.ShowDialog();
}

static public void StopForm()
{
    if (moForm == null) return;
    moForm.Close();
    moForm = null;
    moOwner = null;
}


It Accept, as input, a ProgressArgs object with all information needed. Here a simple example how to use it:

private void btnThread_Click(object sender, EventArgs e)
{
    const int MAX_FILE = 5;
    const int MAX_REC = 3600;
    int iPerc = 0;
    WorkInProgress.StartFormAsThread(this);

    for (int j = 1; j <= MAX_FILE; j++)
    {
        for (int i = 1; i <= MAX_REC; i++)
        {
            iPerc = (int)((i/(float)MAX_REC ) * 100 );
            Debug.Print(string.Format("record: {0} ({1}%) file: {2}", i, iPerc, j));
            WorkInProgress.UpdateThreadProgress(new ProgressArgs(MAX_FILE, 0, j, 100, 0, iPerc, "file: " + j.ToString()));
        }
    }

    WorkInProgress.StopFormAsThread();
}


/// 
/// Argument class used to monitoring the computation progress 
/// 
public class ProgressArgs : System.EventArgs
{
    public int FileMax;
    public int FileMin;
    public int FilePos;
    public int Max;
    public int Min;
    public int Pos;
    public string FileName;

    public ProgressArgs()
    {
        Max = 0;
        Min = 0;
        Pos = 0;
        FileMax = 0;
        FileMin = 0;
        FilePos = 0;
        FileName = "";
    }

    public ProgressArgs(int filemax, int filemin, int filepos, int max, int min, int pos, string fileName)
    {
        Max = max;
        Min = min;
        Pos = pos;
        FileMax = filemax;
        FileMin = filemin;
        FilePos = filepos;
        FileName = fileName;
    }
}

Friday, March 15, 2013

Unit of measure conversions


Recently I have faced a simple problem of conversion between differents unit of measures Systems. In this case I found very useful to build a class that manages many of these passages. Every thing need to be oriented in the right way, I mean, a classes collection that can help our job. A tool box where to look for when necessary.

The class that I'm going to illustrate in this post is very simple to improve, and is very simple as well to use. In many years of programming experience, I find incredible surprising when I discover how clever solutions are always very easy. In this way, the object programming is a good logical instrument to use in all their aspects.

First of all I defined two Enum collections: one defines a unit of measure groups and another one the unit of measures adopted or to be used on our software. Obviously, the last collections can be increased.

  
public enum EnumUMType 
    { time, weight, lenght, temperature, volume, speed, 
      voltage, pressure, hardness, energy }
public enum EnumUnitOfMeasure 
    { K, C, F, mm, cm, m, km, ft, mi, gr, kg, lb, sec, min, hour, 
      m_s, km_h, mp_h, V, mV, J, Pa, MPa, psi, kpsi, kgfm2, ti2 }


The next step was to define a class that defines a unit of measure and its relations with the equivalent international systems um.

 
public class UMInfo
{
  public bool Standard { get; set; } //Is international standard UM
  public EnumUMType Type { get; set; }
  public EnumUnitOfMeasure UM { get; set;}
  public string Description { get; set;}
  public double Coefficient { get; set; } //coeficient to multiply in order to convert into International Standard UM equivalent 
  public double Constant { get; set; } //constant to add for the conversion

  public UMInfo(bool bStandard, EnumUMType oType, EnumUnitOfMeasure oUM, string sDescription, double fCoefficient, double fConstant = 0)
  {
    Standard = bStandard;
    Type = oType;
    UM = oUM;
    Description = sDescription;
    Coefficient = fCoefficient;
    Constant = fConstant;
  }
}


Every um can be transposed to an equivalent one, just multipling or dividing it to a coeficient and maybe summing it with a constant. I summarized all conversions to this simple formula:
Formula: [Standard UM] = [value] * [Coefficient] + [Constant]

The "Standard" property indicates if the unit of measure is adopted from the international standard. In this case the "Coeficient" property is always 1.

The core class is obviously a collection of "UMInfo" that exposes some methods to convert between one of them, towards an international one or towards another equivalent one.


public class UMConversion
{
    public List UMInfos = new List(); //List of all units

    public UMConversion()
    {
      Inizialize();
    }

    private void Inizialize()
    {
      //Space
      UMInfos.Add(new UMInfo(true, EnumUMType.lenght, EnumUnitOfMeasure.m, "meter", 1));
      UMInfos.Add(new UMInfo(false, EnumUMType.lenght, EnumUnitOfMeasure.cm, "millimeter", 0.001));
      UMInfos.Add(new UMInfo(false, EnumUMType.lenght, EnumUnitOfMeasure.mm, "centimeter", 0.01));
      UMInfos.Add(new UMInfo(false, EnumUMType.lenght, EnumUnitOfMeasure.mi, "mile", 1609.347));
      UMInfos.Add(new UMInfo(false, EnumUMType.lenght, EnumUnitOfMeasure.ft, "feet", 0.3048)); 

      //Weight
      UMInfos.Add(new UMInfo(true, EnumUMType.weight, EnumUnitOfMeasure.kg, "kg", 1));
      UMInfos.Add(new UMInfo(false, EnumUMType.weight, EnumUnitOfMeasure.gr, "gr", 0.001));
      UMInfos.Add(new UMInfo(false, EnumUMType.weight, EnumUnitOfMeasure.lb, "pound", 0.45359));

      //Temperature
      UMInfos.Add(new UMInfo(true, EnumUMType.temperature, EnumUnitOfMeasure.K, "Kelvin", 1));
      UMInfos.Add(new UMInfo(false, EnumUMType.temperature, EnumUnitOfMeasure.C, "Celsius", 1, 273.15)); 
      UMInfos.Add(new UMInfo(false, EnumUMType.temperature, EnumUnitOfMeasure.F, "Fahrenheit", 0.5555, 255.3722)); 

    }

    public object Convert(double value, EnumUnitOfMeasure um)
    {
      UMInfo umsource = UMInfos.FirstOrDefault( i => i.UM ==  um );
      if (umsource == null) return null;
      return value * umsource.Coefficient + umsource.Constant;
    }

    public object Convert(double value, UMInfo um)
    {
      return Convert(value, um.UM);
    }

    public object Convert(double value, EnumUnitOfMeasure umFrom, EnumUnitOfMeasure umTo)
    {
      UMInfo umsource = UMInfos.FirstOrDefault(i => i.UM == umFrom);
      UMInfo umtarget = UMInfos.FirstOrDefault(i => i.UM == umTo);

      if ((umsource == null) || (umtarget == null)) return null;
      if (umsource.Type != umtarget.Type) return null; 

      double std1 = value * umsource.Coefficient + umsource.Constant;
      return (std1 - umtarget.Constant) / umtarget.Coefficient;
    }

    public object Convert(double value, UMInfo umFrom, UMInfo umTo)
    {
      return Convert(value, umFrom.UM, umTo.UM);
    }

    public UMInfo GetStandard(EnumUnitOfMeasure um)
    {
      UMInfo umsource = UMInfos.FirstOrDefault(i => i.UM == um);
      return UMInfos.FirstOrDefault(i => i.Type == umsource.Type && i.Standard == true);
    }
}

On this example it is possible to decide the um type and filter the um assigned to it.


The code below shows how simple is the class usage, just one method for all conversions. Obviously this class it can be  improved but this was not the aim of this post.
 
UMInfo from = oUM.UMInfos.FirstOrDefault(i => i.Description == cmbFrom.Text);
UMInfo to = oUM.UMInfos.FirstOrDefault(i => i.Description == cmbTo.Text);

double val = double.Parse(txtValue.Text);
object res = oUM.Convert(val, from, to);

lblResult.Text = string.Format("{0:0.####}", res);


download source code