
In this Post I will start to talk about how to project a Professional UI and what it should be useful to develop in order to maintain and create it.
In figure below you can see an UI that I have projected for GSLab, a computational program used to project substation grounding grid.
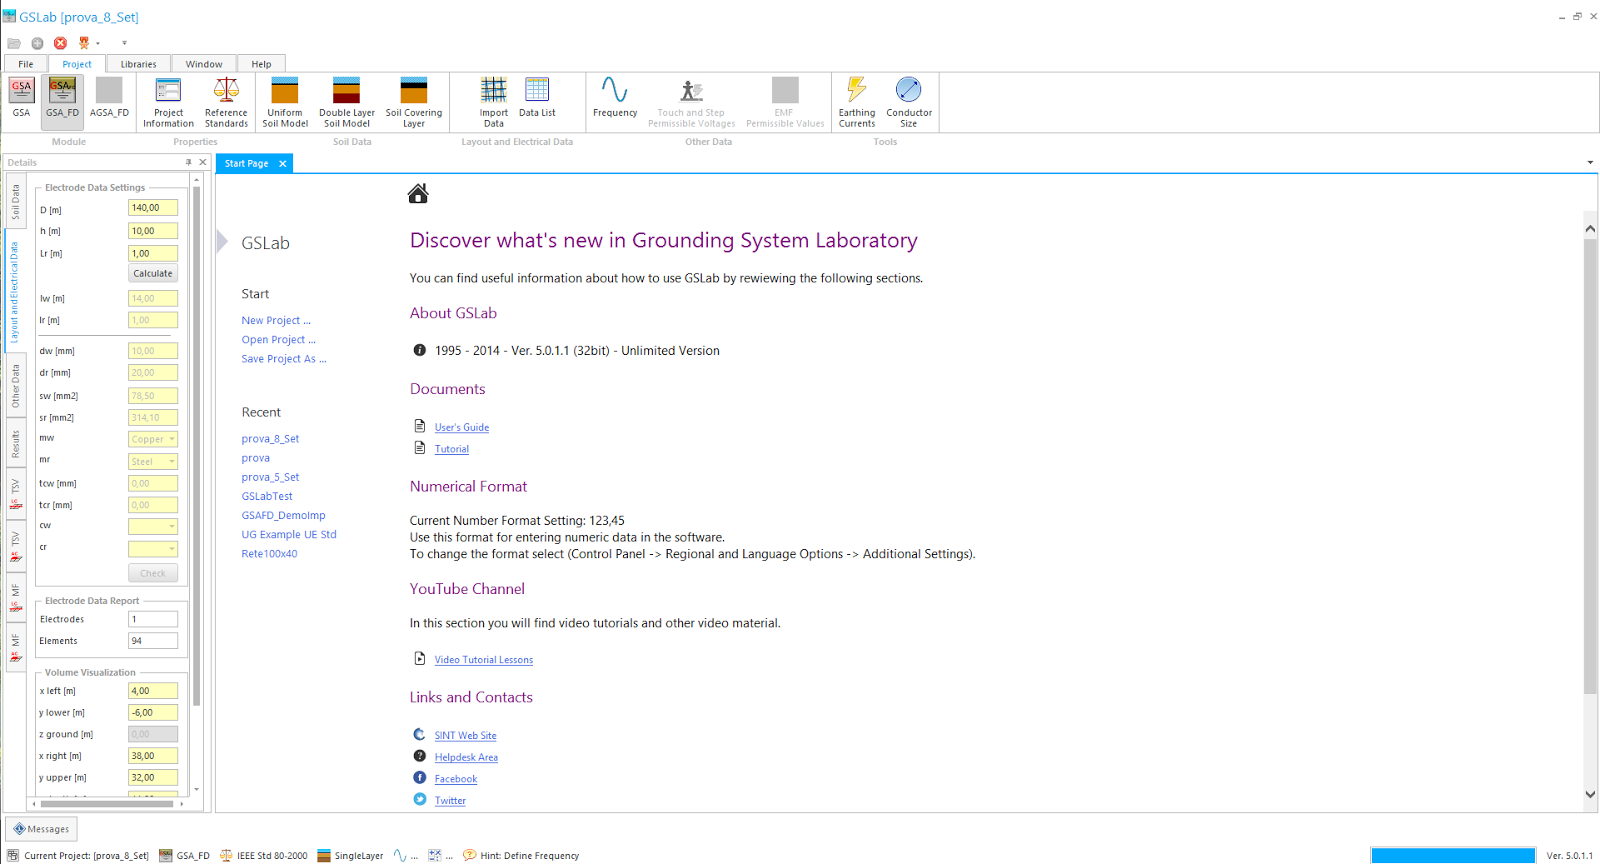
I toke inspiration by Visual Studio Interface, Microsoft Word and other common application on commercial market. What works for many it should work for few. In this UI it is possible to find many useful features.
- A Toolbar (Ribbon Style), with items that appear and disappear it depends on program status.
- A Status bar that resume all main selections, program status, some user advice
- A Left Panel where the user input parameters
- A Start Page that works like a web browser.
Let's concentrate on Start Page.

We can distinguish three areas: Every one of which is very useful for the user’s experience.
Start: Gives to users the mains starting functionalities.
Recent: The List of last used projects.
Html: Area with useful information and links.
Before create this page, we have to create the separate functionalities that it grasp together. These functionalities could be accessed from different parts of the program. For example the "Recent List".
The “Recent List”
What is
"the Recent List"?
Well. It is
quite trivial to explain it and maybe it is not necessary to do that, but I
will try anyway. First of all, it is a list, where we can find a maximum number
of project references. This list has a project reference as unique key, this is
because a project reference can appear just one time.
A project
reference can be seen as a file, a name, a title, doesn't matter. In this
particular case a Project Name.
Furthermore,
the top item of the list is the last inserted. If an element already exist into
the list when we try to insert it, then it is moved on top.
Example:
Recent List - State 1
1
|
Project C
|
2
|
Project B
|
3
|
Project F
|
Three
projects inserted.
We Add a
New project Project Z
Recent List - State 2
1
|
Project Z
|
2
|
Project C
|
3
|
Project B
|
4
|
Project F
|
Four
projects inserted.
We Add again
a project Project C
Recent List - State 3
1
|
Project C
|
2
|
Project Z
|
3
|
Project B
|
4
|
Project F
|
Four
projects inserted.
Now it is
clear how it works and we can start to make a class that do that.
Where to
store these information?
Also in
this case there are many possibilities I decide to use the Windows Registry.
public class FilesHistory: RegistryBase
{
const int MAX_ELEMENTS = 10;
List moFiles = new List(MAX_ELEMENTS);

public List Files

public FilesHistory(string sCompany, string sApplicationName)

public void Save()

public void Load()

public void Add(string sFileName)
}
The class
definition it is very easy as it should be. It inherited from another class (RegistryBase)
that it is not here explained but also easy to create.
A single
property “Files” that contains the
elements, and three methods: Save, Load, Add.
- Save, as the name said, saves a list into the registry.
- Load, loads from the registry and populate the list.
- Add, append a new item into the list.
The Add()
method use a private method Append() as well.
It removes the element instance if exist then append it. If a maximum number of elements is
reached the last element is removed.
public void Add(string sFileName)
{
moFiles.Remove(sFileName);
Append(sFileName); //FIFO

if (moFiles.Count == MAX_ELEMENTS)
moFiles.RemoveAt(moFiles.Count-1);
}
The
Append() method use a temporary list, where inserts the new element at the top,
and then append all the old list.
private void Append(string sFileName)
{
List moFilesNew = new List(MAX_ELEMENTS);

moFilesNew.Add(sFileName);
foreach (string item in moFiles)
{
moFilesNew.Add(item);
}

moFiles.Clear();
moFiles.AddRange(moFilesNew);
}
Lets check
the other two methods Save() and Load():
public void Save()
{
for (int i = 0; i < MAX_ELEMENTS; i++)
{
if (i < moFiles.Count)
Write("Main", "File" + i.ToString(), moFiles[i]);
else
Write("Main", "File" + i.ToString(), "");
}
}

public void Load()
{
for (int i = 0; i < MAX_ELEMENTS; i++)
{
string s = Read("Main", "File" + i.ToString());
if (s != "")
moFiles.Add(s);
}
}
As you can
see these two methods uses Write(), and Read() methods inherited from the base
class RegistryBase.
Ready to use
Now you are
ready to use this class
Declaration:
FilesHistory HistoryFiles = new FilesHistory("MyCompany", "AppID");
The
constructor parameters are the keys used for registry storing.
Starting
the Application, the list is loaded:
HistoryFiles.Load();
Populate a
menu list:
private void RefreshMenuHistory()
{
    mnuHistory.ClearLinks();


    for (int i = 0; i < moApp.HistoryFiles.Files.Count; i++)
    {
        BarButtonItem bt = new BarButtonItem();
        string[] lInfo = moApp.HistoryFiles.Files[i].Split('|');

        try
        {
            bt.Caption = lInfo[1];
            bt.Hint = "Dir: " + lInfo[0];
            bt.Tag = i;

            if (Directory.Exists(lInfo[0] + lInfo[1]))
            {
                mnuHistory.AddItem(bt);
                bt.ItemClick += bt_ItemClick;
            }
            else
                moApp.HistoryFiles.Files.RemoveAt(i);
        }
        catch (Exception)
        {
            moApp.HistoryFiles.Files.RemoveAt(i);
        }
    }
}
In this
case, if a file does not exist the item is removed from the list.
Add new
items on the list, when you open a project:
HistoryFiles.Add(ProjectsDir + "|" Project.ProjectName);
HistoryFiles.Save();
I end my
explanation here, for the moment you have to enjoy.